

A Plethora of Pinked Hearts from Liz Kettle
A Plethora of Pinked Hearts from Liz Kettle
A Plethora of Pinked Hearts from Liz Kettle

Tutorials by Liz Kettle, Textile Evolution
I never used to be a ‘heart’ person. When I was in my formative art years, hearts were passé, trite and so unsophisticated. I was forced into using hearts because it is a great shape for teaching techniques; simple, recognizable, everyone can draw one, perfect for appliqué with curves with both inside and outside points and most people like them. Somewhere along the way I realized that even if they were trite in the ‘serious’ art world I had fallen in love with them! I make my art to please myself these days, so even if the sophisticated shock artists of the world roll their eyes and dismiss me as trite…I am contented with my hearts. Just like we often dismiss simple shapes we dismiss utilitarian tools or stitches. Take the lowly pinking shear…designed to help prevent fraying at the edge of fabric, very utilitarian…of course, most seamstresses found the little zigzag edge appealing but didn’t often call upon that cuteness for decorative effects. I have always loved rickrack and pinked edges so when I wanted to make a woven fabric base with just a little more pizzazz than normal for my hearts I grabbed those pinking shears and well…I fell in love yet again! How could I resist that little zigzag edge? Weaving fabric is another often overlooked technique that is simple and low tech but gives you a wonderful intricate look. Using the pinking shears for the woven fabric strips gave me the bonus texture I was looking for and also made it easier to weave my strips together. I thought for a moment that it might be going over the top but I went for it anyway and pinked the edges of my hearts for an easy finish that doubles the cuteness factor.  I got a little carried away with possibilities for this plethora of precious pinked hearts. For most of these projects you don’t even need a sewing machine, so they would make great group projects. I hope one or two of them inspire a little woven and pinked love in your creative life.
Supplies
- Fabrics: 2-4 fabrics that blend or contrast. Fat quarters work well, or you could even use scraps.
- Havel’s Pinking shears
- Misty Fuse or other fusible web
- A non-stick ironing and craft sheet, such as the Goddess Sheet
- Craft felt — I used white, cut 12" x 17". Your piece can be smaller or larger depending on how many hearts you desire
- Pearl Cotton or embroidery floss, and embroidery needles
- Marking pencil and ruler
- Ribbon for the heart banner
- Poly fiberfill for stuffing puffy hearts
Making a Woven Fabric Base
Follow these steps for making your woven fabric base.

1. Use the ruler and marking pencil to draw parallel lines on your fabric ½" apart. I drew 12-15 lines on each of three different, but blending, fabrics. You can get a different look by using contrasting fabrics.

2. Use pinking shears to cut along each drawn line. With this project you don’t have to stress about getting perfectly even strips so don’t worry if you don’t cut exactly on the line every time.

3. Make a big pile of pinked strips…isn’t it yummy???

4. Cut Misty Fuse to the same size as your felt base. Place on the felt and cover with a Teflon pressing sheet. Iron to fuse the web to the felt.

5. Place pinked strips of pink fabric directly on top of the misty fuse/felt in parallel rows. Place them closely together, but a little bit of white space is ok.
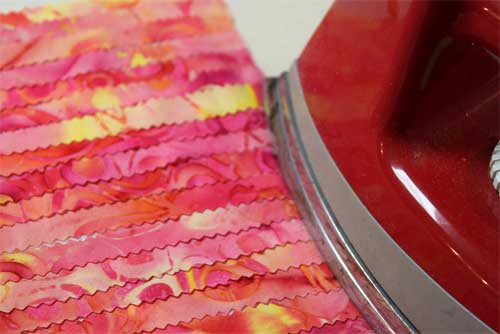
6. Use the iron to fuse an approximately ½" edge of strips on one side only. Be careful not to fuse more than about a ½".

7. Peel back every other strip of pinked pink fabric to the right. We will call this the warp row.

8. Place a strip of pinked pink fabric vertically on top of the remaining rows. This is the weft row.

9. Replace the strips of warp fabric that you moved to the right. Now peel back the other rows of warp strips.

10. Place another weft strip vertically. Replace the warp strips. Alternate the warp strips that you peel to the right. Use a pin or your fingernail to scoot the fabric strips together snuggly if needed.

11. Use a hot iron to fuse the woven fabric to the felt.

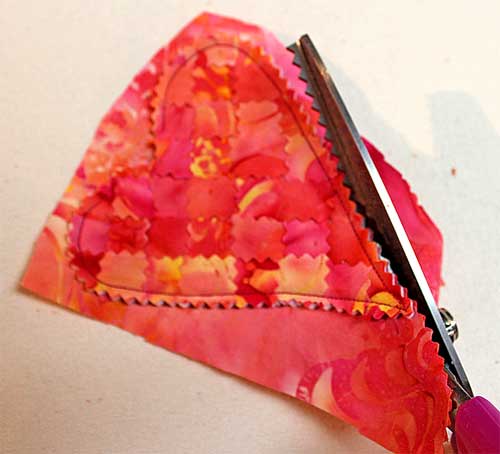
12. Make a heart template out of paper or plastic. Draw the template shape on the back of the felt. I like my woven fabric to be off kilter a bit, so I drew my hearts at an angle. Cut out hearts with your pinking shears. This is where you will really appreciate Havels’ pinking shears! They are lighter weight than most and cut through layers so easily you would think it was only one layer. Now you can use your hearts in a plethora of ways! Don’t you love the word plethora? I use it as often as possible...
Pinked Heart Garland
Follow these steps to create your Pinked Heart Garland:

1. Adhere Misty Fuse to the back of one of your plain fabrics using a Teflon sheet to protect your ironing surface. Draw the heart template on top and cut out as many hearts as you need for your banner. My banner has 5 hearts that are 4½" tall.

2. Place a heart on your ironing surface, fused side up. Place the ribbon across the heart leaving enough ribbon for tying in place.

3. Place the pinked woven heart on top of the heart/ribbon layer and fuse in place. Repeat for all your hearts. Stitch around the edge with a running stitch by hand, or you can machine stitch. Hang in a prominent place and delight everyone who sees it...they are going to smile just because it is so happy.
Puffy Pinked Heart
Follow these steps to create your Puffy Pinked Heart:

1. Cut a scrap of fabric for the backing slightly larger than your pinked heart. Pin in place.

2. Stitch around the perimeter of the heart, leaving a gap at the very middle of the heart for stuffing. I use a shorter stitch length when I make something that will be stuffed.
3. Cut out with pinking shears. Stuff the heart with polyester fiberfill. Stitch the opening closed by hand or machine.  Final steps: add a hanging cord or give it to a stitch friend for a pincushion (some sand or plastic beads added at the stuffing phase will make a sturdier pincushion). I embellished mine with some beads at the bottom and hung it up with my vintage chandelier crystals in the studio window.
Stitched Pinked Heart Card
Follow these steps to create your Stitched Pinked Heart Card
- Cut or tear a piece of art paper slightly smaller than the card size. Stitch a running stitch around the edge with pearl cotton or embroidery floss.
- Stitch a curved running stitch on your pinked heart with pearl cotton or embroidery floss. You could also stitch flowers or other designs.
- Use Misty Fuse to adhere the paper to a card base (I used a premade card base for this special greeting), and then the heart to the paper.
- Add a decorative strip of fabric or other embellishments as desired.
Pinked Conversation Hearts
Follow these steps to create your Pinked Conversation Hearts: 
- Fuse a backing fabric to the back of your woven heart fabric.
- Trace 2" hearts and cut out with pinking shears.
- Stitch around the outside edge.
- Print conversation heart sayings on ribbon or twill tape. Directions to print onto ribbon or twill tape are available in both of my books or you can search online for tips.
- Cut Misty Fuse in thin strips the width of your ribbon/twill tape and fuse the sayings to your hearts.
About Liz Kettle
Liz Kettle is a mixed media and textile artist living in Colorado. She is the author of First-Time Beading on Fabric: Learning to Bead in Nine Easy Lessons and Know Your Needles; and is the co-author of Fabric Embellishing: The Basics and Beyond (with Ruth Chandler, Heather Thomas and Lauren Vlcek) and Threads: The Basics and Beyond (with Debbie Bates). Visit her website at www.TextileEvolution.com.

Categories
Popular posts


Leave a comment