Create a Composition Book Cover!
I wanted to share a quick book cover tutorial with you.

I find composition books ugly, but plentiful and cheap. My goal was to create an attractive book cover where I can easily pull out a filled-in notebook and replace it with a fresh one. I believe that composition books will be around for years into the future, so it’s a reliable resource.
I used Roc-lon Multi Purpose Cloth (MPC) in this project. I’ve often remarked on this versatile product on this blog — it can be used whenever you would use canvas: easy to cut (doesn’t fray) and sew, soft, flexible and already prepared to accept paint or mediums.
The first step: measure and cut a piece of MPC the size of the book cover, including inside sleeves. The composition book I used was approximately 9.5 in. tall x 7.25 in. wide (closed), so for this book I used a 24 in. wide strip that was 10½" tall. This measurement was approximately an inch taller than my book, which is approximately 14.5 in. wide when opened.

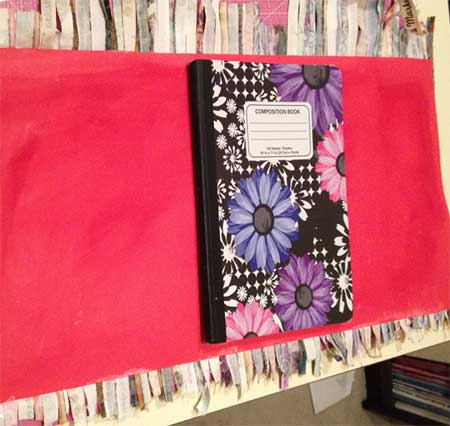
Next, paint one side of the MPC with your choice of acrylic paint(s) — I chose shades of tomato red (above). This painted side will be the inside of the cover.
I choose Lite Steam-A-Seam 2 as my fusible for this project (instead of the Mistyfuse I so often recommend to you) because Steam-A-Seam is sticky: you can put your fabric in place, but can move your design around because the adhesive is repositionable before fusing it permanently.
Your Steam-A-Steam needs to be the same size of your MPC. I had sheets of Steam-A-Seam in my stash, so I needed to butt two sheets together for this project, but this product is also available by the yard so you could easily match the length you’d need for this project. (Note that there is additional information from a previous blog posting on working with Steam A Seam 2.)

I have long collected the selvedges from my fabrics rather than discarding them. I love the writing, number and circle color codes on them! I used a lot in this project, but did intersperse colorful strips of fabric too (above). Remember that you can use paper with Steam-A-Seam too...and your design doesn’t have to be in strips as mine is: let your imagination run wild.
Once you have covered your Steam-A-Seam with your fabric (or paper), then fuse it to the unpainted side of the MPC with your iron (follow the instructions included in the Steam-A-Seam packet.

Above is where we are with the project so far. As you can see I didn't worry too much over measuring my fabric strips ahead of time; simply used my rotary cutter and ruler to trim the edges even.
Once my cover was trimmed, I took it to my sewing machine to use some of my “fancy” machine stitches to embellish it further (detail below).

The MPC has a sturdy weight to it and the fusing holds it all together, so stitching isn’t necessary — and leaving it out makes this an even quicker project! But I love the decorative touch it adds.

To create the sleeves, place your composition book, opened, in the middle of your collaged MPC (painted side up). Then fold your extra width over each side. You can crease the MPC to mark it or clip it down as desired. Then slide the book out. I top-stitched each sleeve down at each end with a straight stitch on the right side.

For an extra touch, I tacked down two extra selvedge strips with zig zag stitching at the top middle of my inside cove (above)r, so I can use them as bookmarks.

Above is my completed selvedge strip composition book cover!

And here’s the same concept, except that this time for my cover I used a single piece of fabric for the cover (from my stash; it’s printed to look like marbled squares placed side by side). I embellished this with retangles of Angelina and free motion stitching in curves and circles. I used a recycled binder for my inside.

Notice with this version the sleeve covers more of the notebook than the previous one did. The edges for this one were satin-stitched all the way around using black thread.
I hope this tutorial inspires you...this project offers lots of design possibilities!


Leave a comment