Paintstik Rubbings using Vintage Tjaps
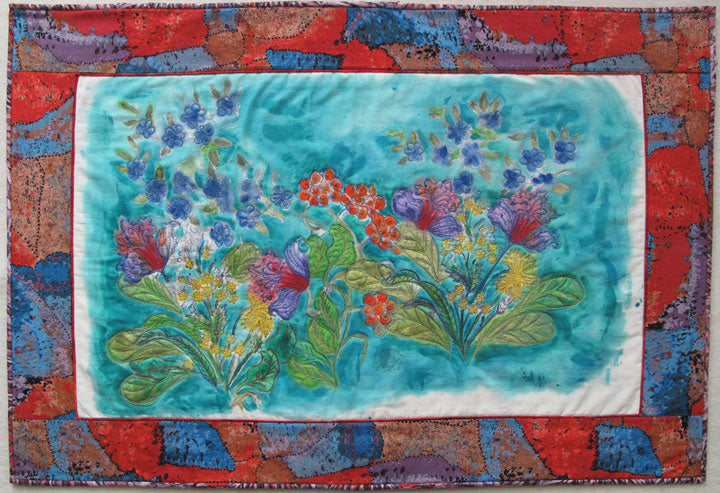 View larger image of above quilt. Note: this tutorial post updated September 5, 2018
Paintstiks are the perfect product to use for creating rubbings from Vintage Indonesian Tjaps. Tjaps, both new and the antiques I’m featuring here, are batik tools that are handcrafted from narrow strips of copper and copper wire that are used to stamp wax patterns into fabric. Tjaps are works of art on their own; while they can still be used to create batik fabric, many people simply display them to admire.
After several attempts on my own at using my tjaps to batik in the traditional method, I now prefer to buy my batiks! Instead, I use my tjaps as rubbing plates...I’m still creating beautiful fabric and using it in my quilts. I’ve previously blogged about this technique and I’m doing so again, as it’s such a favorite of mine!
To follow along with my tutorial, you need the following
- one or more vintage tjaps
- assorted of colors of Shiva® Artist’s Paintstiks®
- 505 Spray and Fix (a temporary, repositionable, fabric adhesive previously discussed here)
- potato peeler
- baby wipes
- stable surface to work on
Artist’s Paintstiks are an oil-based fabric paint in a solid crayon form. They arrive sealed and after use will selfseal — creating a thick and firm skin on the surface, which prevents the Paintstik from drying out and becoming unusable. The skin can be twisted off the tip with a paper towel or using a paring knife, but once I finally found out about using a potato peeler, it’s now my favorite method. It allows you to peel the coating off with minimal waste while creating a wide surface to use while rubbing.
When I am creating a rubbing, I only peel the cover off the one side that I will use. While they are terrific for other uses, I no longer try to use the mini Paintstiks for tjap rubbings: they don’t give me enough surface to hold onto or paint with. I prepare all the colors I plan to use first, and then wipe my hands with a baby wipe to remove the wayward paint before I begin handling the fabric.
In the past I have tried to create a rubbing without using a temporary adhesive, because I was worried that it would hurt the tjap. Not true, as I found when I finally experimented after some less than crisp results. I find that spraying the fabric with 505 Spray and Fix means my fabric will not slide and allows me to create a crisp and clear rubbing.
After spraying 505 — again, on the fabric, not on the tjap — I place the fabric sticky side down atop the tjap and gently smooth it out.
I begin rubbing gently with the full side of the Paintstik. You only need a very little pressure when you are rubbing. You will see that it’s easy to feel the edges of the vintage tjap. My own experience has been that the Vintage/Traditional Tjaps, which feature a lot of intricate details create a much more interesting rubbing than some of the new tjaps.
Once you have completed your rubbing, allow the Paintstiks to fully dry on the fabric. Shelly Stokes of Cedar Canyon Textiles, a Paintstik expert, writes that “Rubbings (and any direct application technique) take longer to dry. Allow 3-5 days for the paint to dry. I allow 7 days if I make several layers of rubbings — or during humid times of the year. Test the paint by rubbing your finger over a section of paint. If you see paint on your finger, it’s not dry yet. Set the fabric aside for another day. Once you no longer pick paint up with your finger, it’s ready to heat set.”
Shiva Paintstik color is permanent on fabric and washable once it has been heat-set with an iron, so if you choose you can incorporate a fabric rubbing into a garment or tablecloth. (Note that because of the oil composition of the paint, note that fabric can’t be dry-cleaned.) While it’s not necessary to heat set your fabric rubbing for an art quilt that won’t be laundered, it doesn’t hurt to do so, and it’s a quick process.
Above is the finished Paintstik rubbing and the vintage tjap together pictured together. Pretty cool, huh? (The tjap looks slightly larger than the rubbing because it is resting flat on its handle and thus is a couple inches closer to the camera.)
The above sample, pictured with the vintage tjap used, was created with two Paintstik colors on a light batik fabric. It’s a pretty illustration that the fabric doesn’t have to be black for the rubbing to pop.
The piece featured at the top of the posting (click here for a larger view) resulted from a demo at a show. I used many different vintage tjaps to create a garden.
After the Paintstik rubbings had dried, I painted the background with textile paint — see detail above. The paint I used was water-based, and since oil and water don’t mix, the paint accents I added did not hide any of the rubbing.
I thread painted the rubbings (detail above) with what was then a favorite variegated thread. This further embellished the colors. Now that Artistic Artifacts sells WonderFil Specialty Threads I have even more beautiful thread options to explore!
To finish off the quilt, I added an inner red mini piping using the Groovin’ Piping Trimming Tool by Susan K. Cleveland (previously reviewed in this posting. My center panel is bordered with some of our beautiful Aborigine design fabric: Landscape Red by Stephen Pitjara. The outer binding was created with Bush Yam X2 Red by Jeannie Pitjara (updated 9/5/18: these fabrics have been discontinued).
I hope I’ve encouraged you to give Paintstik rubbing a try — it is an easy and satisfying method of surface design!





Leave a comment