Vintage Hankie Quilts
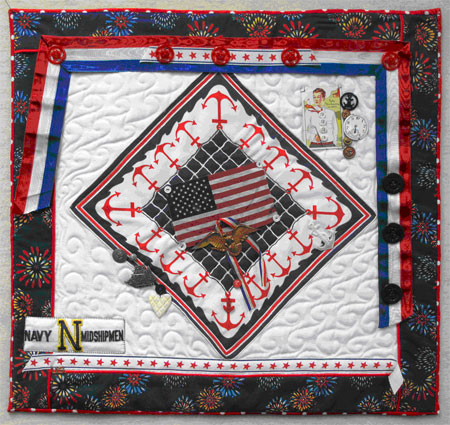
I am grateful for the friends and family that I have, including a special family, the Buck Family. I consider myself an ‘adopted’ daughter to the Buck family. Mr. Buck had his 80th Birthday last year, and he is a proud Navy man. I just so happened to have a vintage hankie that I thought was perfect for him, and assembled all the anchors and trims that I could find for his Birthday quilt. Below is what I sent to arrive within a few days of his birthday.
But you know me...I felt it still needed “more,” so I asked to have it returned to me for additional work. Last week my husband Dave and I were going to spend a few days off with the Bucks in North Carolina, so finishing Mr. Buck’s quilt rose to the top of my to do pile and inspired me to look at my other vintage handkerchiefs. Vintage hankies are like potato chips — you can’t just have one!
Pictured above is a deep drawer where all my washed and ironed vintage hankies are stored.
The two circular handkerchiefs pictured above came from my Grandmother’s stash.
And once family and friends find out you love vintage hankies...
...you are the recipient of some lovely surprises. I love these cards! (Click the photo above for a larger view of these hankie dolls.)
With my interest rekindled from the additional work I did on Mr. Buck’s quilt, I picked out three vintage hankies (pictured below) from my collection to feature in new quilts.
I love the colors and details of these handkerchiefs! In this posting I will give you some ideas and tips on how I created one of these art quilts, and in future blog postings will update the others.
First step is to choose a background and orientation. I’m working with some green hand dyed cotton and the pretty burgundy leaf square within a square hankie.
The above layout can work, but...
Below you can see that I have added a 3-inch striped border. I have purposely let the hankie “creep” into the border, but note that as of this point the hankie has not been stitched to the green hand-dyed fabric. Next I will assemble the quilt sandwich, with the hankie pinned in place.
I decided to quilt the entire hand dyed green area, and looked to 365 Free Motion Quilting Designs by Leah Day for inspiration.
I choose her design #150, Strange Leaf, pictured above. I practiced the direction that my needle would go by drawing on paper, and then jumped in. My leaf was in fact strange... and little more like a heart than a leaf!
As you can see above, I actually folded and pinned the hankie out of the way, and free motion quilted the background green fabric in sections. The reason I do this is to keep the background laying flat and not too puffy when I stitch the hankie at the end.
Above is the quilt so far (larger view). I stitched around the acorns that are printed in the center of the hankie, along the pink “ribbon,” and the outside edge of the hankie. Then I added the binding. At this point, many would consider the quilt done. I am not sure... I think that it needs some embellishment.
I will write more about other Vintage Hankie Quilts and show off my additional work on Mr. Buck’s quilt in future postings. Stay tuned!





Leave a comment