

Disappearing 9 Patch Quilts
Disappearing 9 Patch Quilts
Disappearing 9 Patch Quilts
 Versatile, easy pattern with a complex look!
Guest post by Christine Vinh
December 2024 note: the below blog post about the two quilts I made using the Disappearing 9 Patch pattern focused on using half yard or fat quarter cuts to cut the 5 inch squares you need to make the quilts. Our kits were so popular they were sellouts, so now we’re offering a new fabric kit that uses precut 10 in. squares of Australian Aborigine-designed fabrics in their blue colorway. Scroll to the bottom of this post for more on using 5 in. or 10 in. square charm packs to create a Disappearing 9 Patch quilt!
--------------
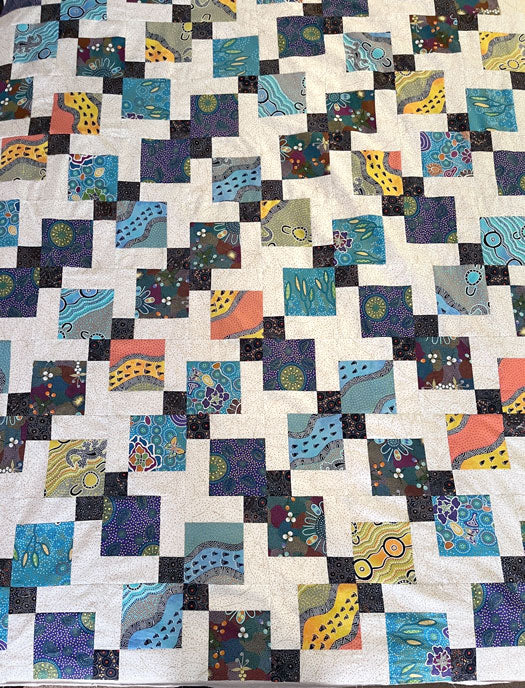
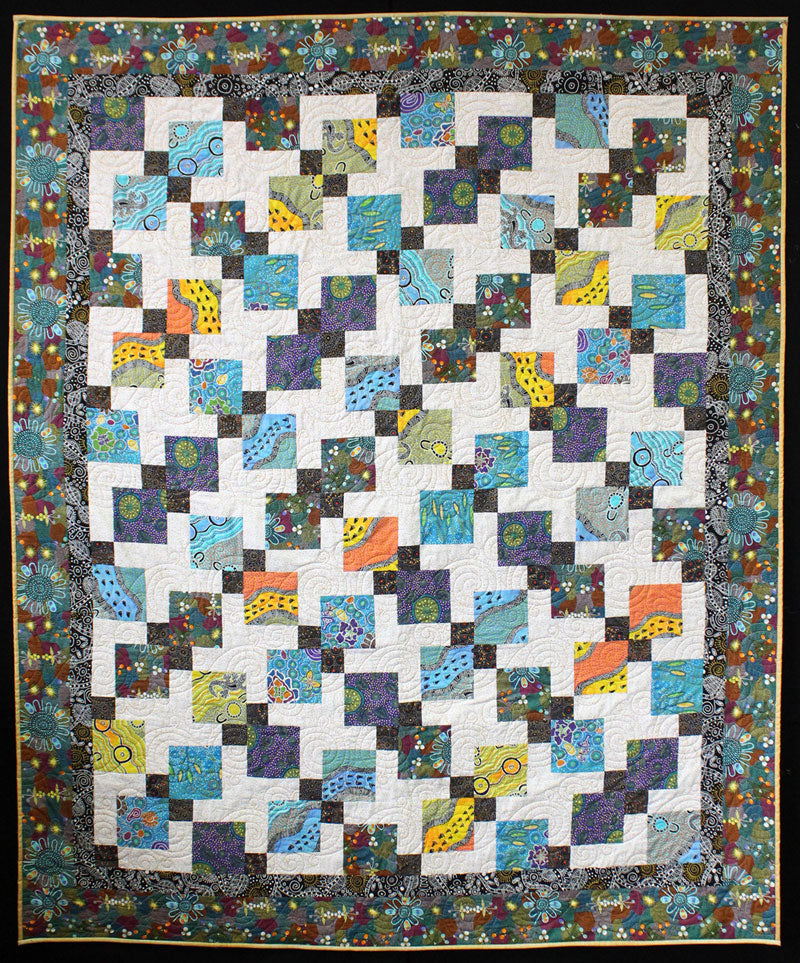
A few years ago I made a Disappearing 9 Patch quilt for the shop using a pack of 10 in. squares of Australian Aborigine-designed fabrics — and we still get asked what pattern was used. And when we answer it’s a Disappearing 9 Patch, we’re then asked the ‘How do You Do That?’ questions!
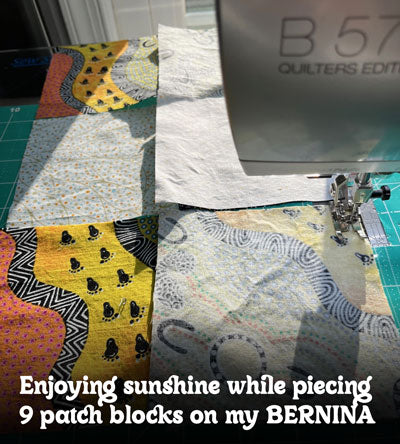
So we decided it was time to make a new sample to document the process (pictured here in progress; see below for a full view of the completed quilt). We were so pleased with the results we’ve decided to make quilt kits for our customers, available while supplies last: our Australian Disappearing 9 Patch Quilt Kit or our kit that includes the colorful Kitty Litter fabrics.
The original sample used the authentic Aborigine-designed fabric from M&S Textiles, so I chose to pick new designs from that collection. I opted to go with five different fabrics for the color and used half yard per color —just in case I wanted to make the quilt larger!
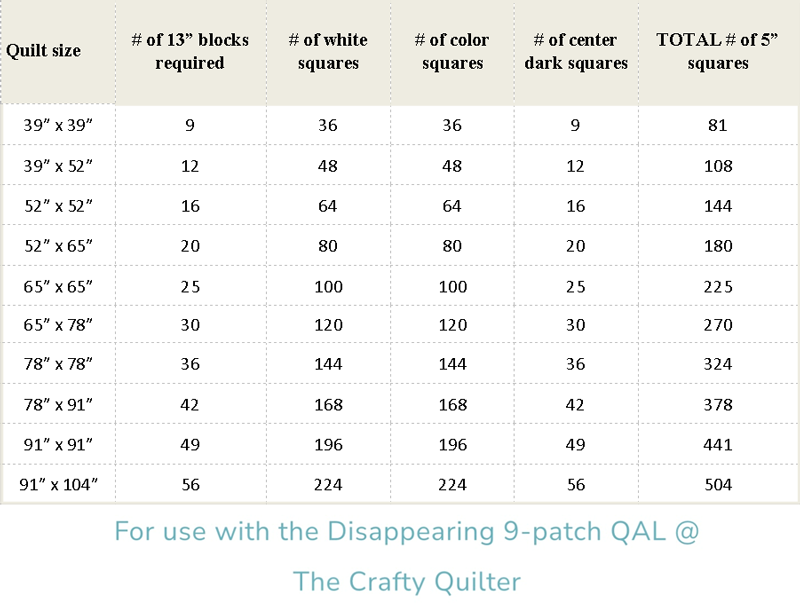
I did some research on Pinterest and found some guides about different quilt block sizes, layouts and finished quilt size. I wanted to use 5 inch squares, and found the table (reprinted above) from The Crafty Quilter Disappearing 9-patch QAL to be the most helpful.
 I chose to make the center portion of the quilt 52 in. x 65 in. and, using the guide, determined that it would require a total of 20 blocks, each made up of 4 (four) squares of color, 1 (one) square of dark, and 4 (four) squares of white.
Fabric requirements for the blocks plus borders:
- Half yard each of four different color fabric, for the blocks
- 1.5 yards of one color, for blocks and for outer border
- 1 yard of dark value fabric, for the center squares and inner border
- 1.5 yards of light value fabric, for the background
Cutting Directions for your 9 Patch blocks:
- Cut 2 (two) 5 in strips from each of your chose color design fabrics and then sub-cut into 5 inch squares for a total of 16 squares
- For the dark blocks, cut 3 (three) 5 in. strips. Two of the strips were sub cut into 5 in. squares and 2 (two) additional 5 in. squares from the remaining strip
- The background fabric was cut into 10 (ten) 5 in. strips and sub cut into 5 in. blocks
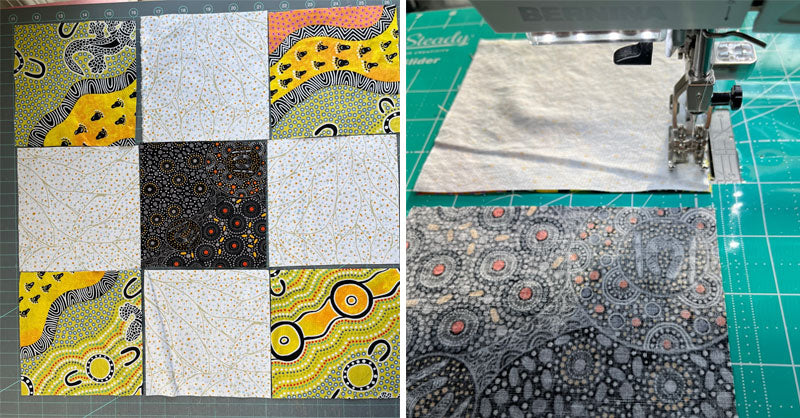
There are a number of layouts one can pick for the starting 9 patch, and I used the basic one — the color fabrics in outer corners, dark square in the middle, and fill in the spaces with the light background fabric. I found it easiest to sew the blocks together one at a time to keep colors in order. I string pieced (above) and then pressed to assure seams would butt up against each other (below).

Once all 20 blocks were assembled and pressed, I cut each block down the center then carefully turned and cut down the center again. This gave me the 80 blocks required for the overall top.
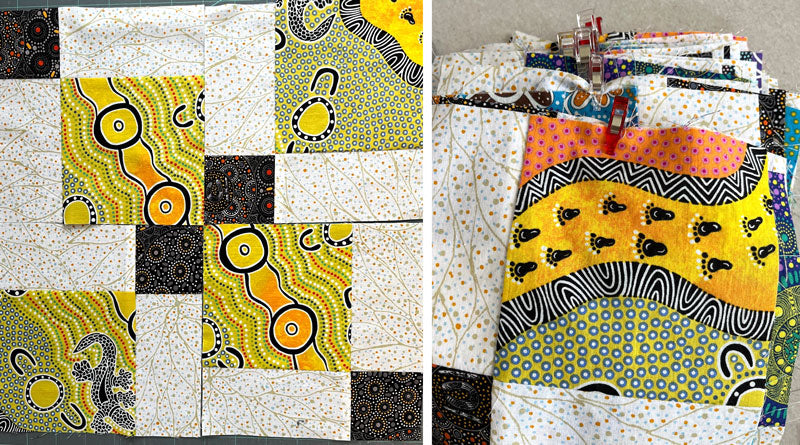
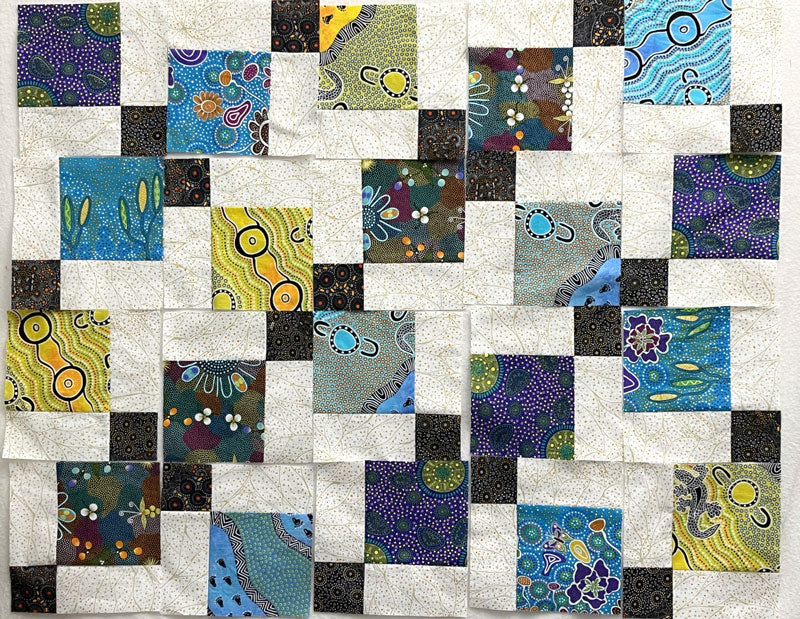
Pictured above left, a block after cutting in and turing two of the quadrants, before sewing back together. Now it’s time to play with layouts of your blocks! For this sample I chose to start with one color block in the upper left corner, adding a different color for each diagonal row. Right, Wonder Clips are handy for keeping your blocks together in rows after you've decided your layout.
There are many different options to lay out your blocks — The Crafty Quilter blog I referenced has several layout diagrams, or do a web search for Disappearing 9 Patch (also Disappearing Nine Patch) — for lots of inspiration! Try different arrangements with your cut blocks until you find the layout that speaks to you! That’s the fun of this pattern!
I always take a picture of what I think will be my final layout, and then walk away before preparing to stitch the rows together. In the second sample I made, this pause for a fresh look helped me to identify one block that was turned in the wrong direction — before it was sewn and preventing me from having to use the seam ripper!

I like to stack all the blocks in a row and then stack the rows to sew one row at a time. I sew the rows together as I go with this pattern, again to make sure I haven’t turned a block in the process.
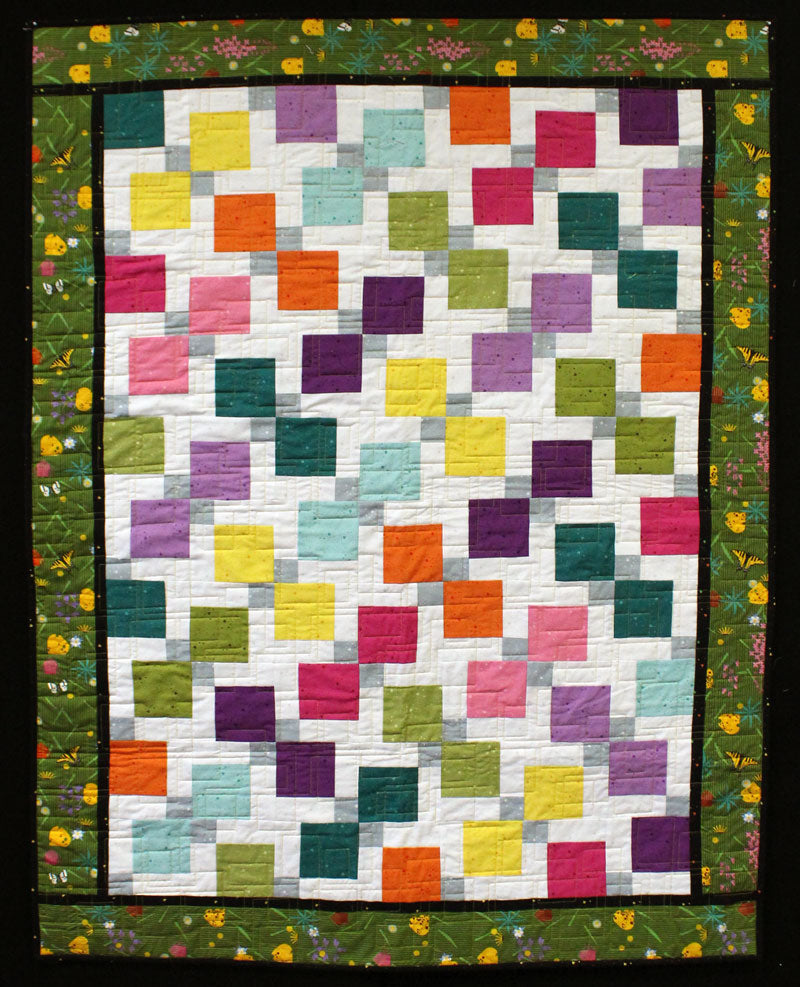
Once the center portion was complete, I cut and pieced the border strips: 6 (six) 2.5 in. strips of the dark design for the inner border and 6 (six) 5 in. strips of the fabric for the outer border. Sew the inner border side strips first and then add the strips for top and bottom. Repeat for the outer border.
Then it was off to the quilter! I chose to use 2 yards of the yellow ombre wideback fabric and had enough left over to use for the binding. (I didn’t mention backing fabric in the fabric requirements; the choice is yours depending on your preference and what size you make your Disappearing 9 Patch.)
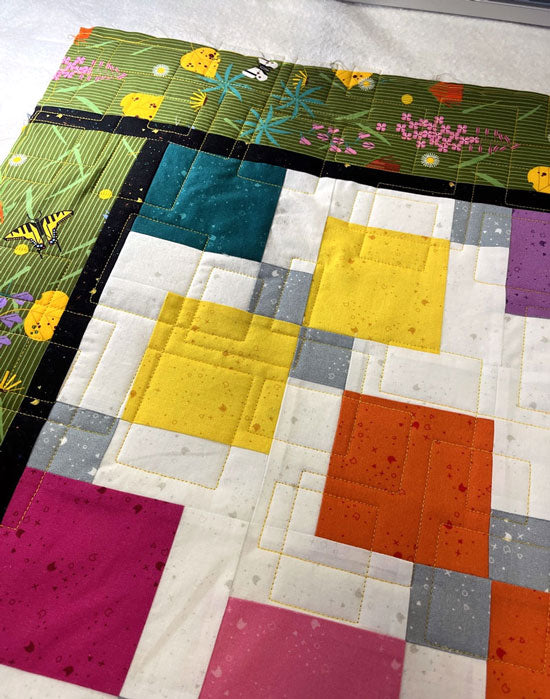
Having enjoyed making the first sample, I decided to try another one using 4 in. strips instead of the 5 in. I love the variety of colors available in the Kitty Litter blender collection from Pammie Jane (Pamela Jane Morgan) for Dear Stella.
 Fabric choices:
- 10 fat quarters of Kitty Litter colors for the blocks (I used a fat quarter bundle and ended up with more than I needed, so chose not to use two of the colors)
- Half yard of Kitty Litter in Drift, for center squares
- 1 yard of Kitty Litter in Neutral, for background squares
- Half yard of Kitty Litter in Laser, for inner border
- 2.5 yards of Charley Harper Rocky Mountain, Mountain Flowers for outer border
Cut two strips, each 4 in. x 22 in. from each of the fat quarters. Then sub-cut each strip into 4 in. squares. Cut the gray and white fabrics into 4 in. strips and sub cut into 4 in. squares. Sew your nine-patch blocks and then cut them, as described above for the Australian quilt.
For the Kitty Litter Disappearing 9 Patch layout, I chose to match color blocks throughout the top. Look closely at the two samples and you can see the difference in the layouts.
Hope you enjoy making either a Disappearing 9 Patch with our kits or fabrics of your own choice. Make sure to share your quilt with us on Artistic Artifacts Creative Minds Facebook group!
December 2024 addition: USING 5 in. or 10 in. PRECUTS: Again we reference the table from The Craft Quilter Disappearing 9-patch QAL which helps to determine how many blocks you will need based on the size of the quilt you are planning on making. For our latest kit, we chose to use the Australian Aboriginal fabrics in the 10 in. square packs to make a quilt the same size as our original kit. There are 40 squares in each pack, two of each designs. As each 10 in. square can be cut into four 5 in. blocks, we used half of the pack.
Our new kit uses half of the Blue Dreamtime 10 in. squares pack and complementary fabrics. You could choose your own favorite color of the Dreamtime packs, adding your own choices of dark value fabrics for center squares, light value background , and outer border. Remember when choosing, the number of precut squares you need is determined by the size of the quilt you are making as listed in the table from the Craft Quilter Disappearing 9-Patch above.
 Other options to consider when choosing pre-cut 5 or 10 in. squares would be our 10 in. squares of Kaffe Fassett fabrics, which would be great with one of the several black and white Kaffe designs for the dark value squares, a background fabric of your choosing, and one of the fabrics in the pack as option for the border fabric.
Using the 5 in. squares of Tilda fabrics would also be fun, with a light and your choice of chambray for dark value and background squares. Each of Tilda’s collections include a number of precut options.
Or just use your scrap fabrics and have fun!
4 comments

Categories
Popular posts


That is just amazing! Thanks so much for answering my question and for sharing the technique!
Excellent instructions and pictures. Thank You
Thanks for sharing. I like disappearing nine patch, and I will try one later this year with African fabrics. Thanks for the idea.
Great article! Directions were clear – easy to understand. The samples were really great!
Would like to see more articles like this one!
Leave a comment