Artistic Artifacts’ Modern Squares Quilt Tutorial


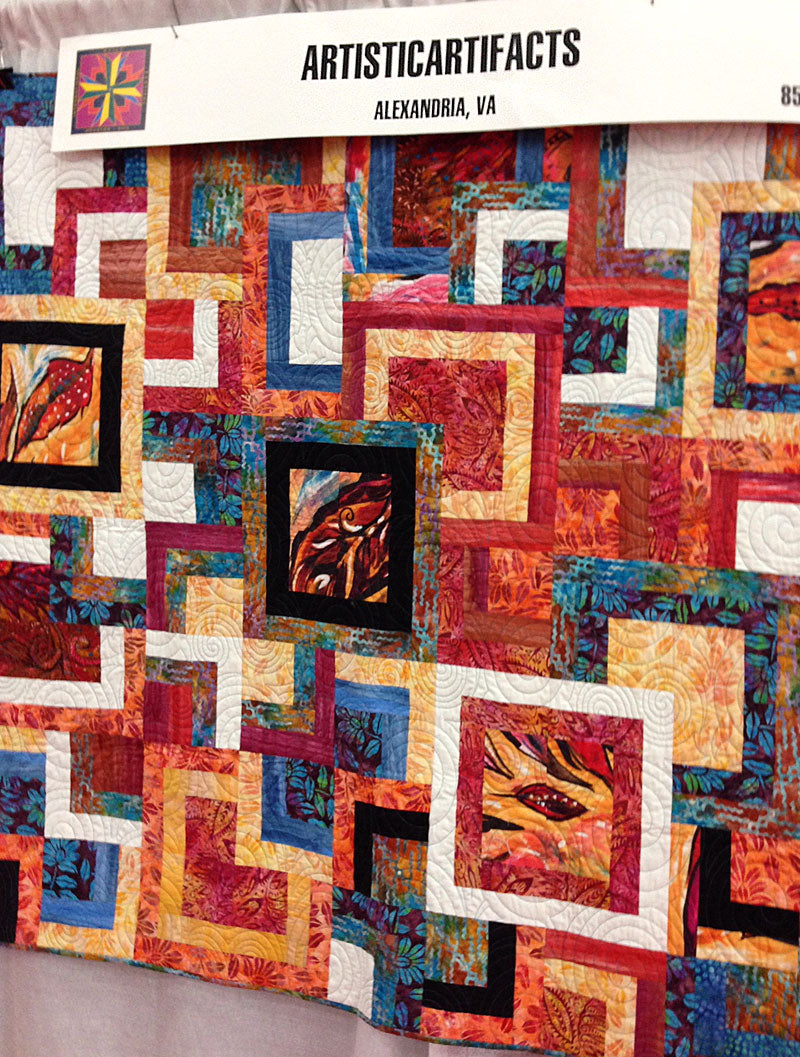
One of the hits of our 2015 booth display at the International Quilt Festival in Houston, TX was this stunning quilt, which was designed, pieced and quilted by Christine Vinh.
Chris has a beautiful instinct for mixing colors and patterns, and combined fabrics from our own Batik Tambal Exclusive Batik collection with those from Frond Design to create both the above pictured quilt as well as another version in cool colors, shown here (right). Want to make your own? Here’s how!
Modern Squares Quilt Pattern
Designed and quilted by Christine Vinh, StitchesnQuilts

This pattern is a modification of Simply Styled Stacked Square Quilt, a free pattern by Erica Jackman of Kitchen Table Quilting. For the Artistic Artifacts/Batik Tambal version, Chris reduced the measurements to 8-inch squares and 2-inch strips.
Instead of using the Jelly Rolls and Layer Cake fabrics that Erica used for this Moda project, Chris cut the fabrics she wanted to use from yardage. This is a great option for using fabrics you love — but feel free to take advantage of the convenience of precut fabrics as described by Erica.
The following are details to get you started: use our instructions for cutting — download a PDF of print instructions — and review Erica’s tutorial for Moda Bake Shop as necessary for sewing and placement.
Our Modern Squares Quilts are made up of 23 squares, using one large square and two pairs of strips for borders around each square. Fabric requirements for a lap quilt, approximately 56 inches x 64 inches:
- 1 yard each of two (2) focus fabrics (as mentioned, we used fabrics from Frond Design and our own Batik Tambal Exclusive Batik)
- 1 yard white
- ½ yard of 6-8 fabrics
- ½ yard fabric for binding
- 2 yards fabric for backing
Cutting:
From the two focus fabrics and the white fabric, cut 2 (two) 8- inch strips and 2-4 (two to four) 2-inch strips the width of the fabric (WOF).
- Cut one of the 8 inch strips into 5 (five) 8-inch squares.
- From the second 8-inch strip, cut 2 (two) 8-inch squares
- and then 4 (four) 2-inch strips from the remaining width of strip long.
From your assorted ½ yards of fabrics, cut 2-inch strips, or a combination of 8-inch strips cut into blocks and strips.
If you have chosen fabrics with stripes, cut the fabric with the stripes running the length of the strip.
Once cut, randomly select one 8-inch square and two sets of different fabric strips to create each block. Vary the selections so your blocks will all be different.
Sewing the Quilt Top:
Erica chose to cut the strips for inner and outer borders around the square; Chris instead used her WOF strips, and trimmed them square to the block as she proceeded.
Sew two strips to top and bottom of a square, press, trim. Repeat the process of sewing the same fabric strip to the opposite sides, creating a square within a square.
Repeat these steps for the second border.
Once all squares are sewn (assortment shown here), cut each square in half vertically, and then in half again horizontally.
With the horizontal cut, you will then have 4 (four) identical quadrants of your original square.
 |
 |
Once all of the blocks are sewn and cut, the real fun begins! Lay out the blocks into a rectangle eight (8) columns wide by nine (9) rows tall using your design wall or open floor space.
Chris used a placement that used a selection of both the Frond fabric blocks and the Batik Tambal Exclusive fabric as “whole” squares, to feature the fabric. Carefully arranging the other quarter squares around these intact blocks is what gives the stacked illusion.
You could also choose to be completely random without having any “whole” blocks. The design is all up to you!
Once you have an arrangement you love, mark/sort your blocks in whatever method you’d like so that your layout will be intact.
Sew your rows together using a standard ¼-inch seam allowance.
The Artistic Artifacts sample is borderless, but you may add one or more borders if you desire.
Finishing:
Note that you will end up with some unused strips and small blocks. Erica suggests that these be pieced together to add interest to your backing fabric.
Once your top is layered with batting and backing fabric, machine or hand quilt as desired.
Use leftover fabric from the yardage to piece your binding, or you may choose to use a complementary fabric. Bind your quilt using your choice of techniques.


Leave a comment